Wednesday, December 21, 2011

Recipe #12 - Holiday Cookies

Holiday Cookies - Before & After

My friend was in a quandry.  She started a low carb nutrition regimen right as the holidays began.  A smart move, in my opinion, to avoid holiday waist inflation!  ;-)  But her usual holiday MO was to make copious quantities of baked goods to give away.  And in the process, much cookie dough was also consumed.  What to do?  This one is for you, friend!


Ingredients for the cookie base (vanilla shortbread)

  • 2 cups almond flour
  • 1/2 cup Splenda
  • 7 packets stevia powder
  • 1 stick (1/2 cup) room temperature salted butter
  • 2 teaspoons vanilla extract
For almond cookies:  add 2 teaspoons almond extract
For pecan sandies: add 3/4 cup chopped pecans & roll dough balls in powdered xylitol (Ideal Confectionary Sweetener) before baking & do not press cookies
For chocolate cookies:  add 1/3 cup unsweetened cocoa powder
For snickerdoodles:  add 1 teaspoon almond extract + 1 1/2 teaspoons ground cinnamon
For chocolate chip cookies:  add 3/4 cup sugar-free chocolate chips or 3/4 cup raw cocao nibs

Preheat oven to 350°F.  Line a muffin tin with paper liners (makes ~20 cookies).  Combine all ingredients using a fork. Form dough into balls using two teaspoons (form 'quenelles' for you chef wannabes). Bake for 7 minutes. Press the dough balls down lightly with the back of a spoon to fill the bottom of the muffin cup (makes a nice round cookie).  Continue baking for another 17 minutes or until just browned on the edges.

Friday, December 2, 2011

Recipe #11 - Spaghetti Squash


Spaghetti Squash - before & after

I have my dear college roommate from junior & senior years to thank for this recipe.  She introduced me to this unusual vegetable.  It looks like any old squash on the outside but cooks up into a crispy noodle facsimile which you pull out from the shell.  Amazing!  I typically serve it with bolognese sauce, but spaghetti squash noodles would work with almost any sauce, even including a chow mein/ lo mein preparation.  The recipe to prepare the noodles is this simple:

1) wash the outside of the squash
2) slice the squash in half across the shorter diameter
3) use a spoon to scrape out the seeds & stringy gunk from the middle
4) place the squash cut side down in a microwave-safe dish, then fill the dish with water 1 cm deep (that's 1/4 of an inch, y'all)
5) microwave 4-7 minutes (depending on size of the squash) on full power
6) carefully remove the squash from the dish (it's so cool - the water gets 'sucked up' into the squash cavity while cooking, & the dish will look dry when you take it out; but when you pick the squash up, the hot water gushes back out of the squash into the pan)
7) use a fork to scrape out the spaghetti squash strands, fluffing any chunks to separate the 'noodles'

Carb-Face & Gout

Carb-face: before carbs & after!!!
It happened to me!  I can still hardly believe it!  I got a raging case of carb-face on Thanksgiving day after waking up from my post carbalicious luncheon nap.  The corner of my left eye swelled up like a tiny water balloon because I had been lying on my left side, which ironically is supposed to be better for circulation & blood return to the heart - a habit I picked up during my pregnancies (see links below for more info on SOS - sleeping on side).  Evidently, my face inflated due to post-carb binging water retention, which then pooled into the dependent  (ie hanging down) portion of my face during my snooze!  http://well.blogs.nytimes.com/2010/10/25/the-benefits-of-left-side-sleeping/  http://www.babyzone.com/askanexpert/sleeping-positions-pregnancy


What is carb-face?  It is the bane of all Hollywood starlets as well as many regular folk.  http://www.dailymail.co.uk/femail/article-1168651/Could-Hollywoods-beauty-gurus-turn-Anna-Richardson-starlet-just-weeks.html  Carb-face is a catchy way to describe bloating that shows up, especially in the face, after consuming a large amount of simple carbohydrates (sugar, white rice, pie, cornbread stuffing, etc!!!).  Some doubt that it is real but now I am a believer!

Why does carb-face happen?  We expect bloating after having a lot of salty foods or sports drinks but not so much with sugary or starchy foods.  In a nutshell, insulin acts on the kidneys to retain sodium while dumping potassium.  This link to a research abstract describes this in technical lingo: http://www.ncbi.nlm.nih.gov/pubmed/2676669

In fact, the following review article abstract explains something that I had also observed during my low carb sojourn: http://www.ncbi.nlm.nih.gov/pubmed/9377725  The effect of insulin on the kidneys is such that uric acid is not cleared as effectively from the blood. http://ajpendo.physiology.org/content/268/1/E1.abstract  Increased uric acid concentrations can lead to gout (joint pain due to uric acid crystal formation in the synovial fluid). http://arthritis.about.com/od/gout/a/gettoknowgout_2.htm   I used to suffer with joint pain in my hands, which weakened my grip & things constantly slipped out of my hands, and in my bunions, which felt like an icepick stabbing into my feet.  When I went low carb, absolutely unexpectedly, my chronic joint pain disappeared.  I had been to the point of consulting my doctor who then referred me to a rheumatologist.  But before I made the appointment with the specialist, I noted the disappearance of the pain.  It does come back after cheating with high carb treats but it resolves again when I eat clean.  This link is to a blog by a DO (osteopathic doctor; they go through a slightly different medical school program than MDs but go through the same internship & residency programs to practice medicine & gain specializations) who explains the phenomenon in a more understandable way than the more technical papers & abstracts: http://www.nemechekconsultativemedicine.com/?page_id=1364

This uric acid retention also tends to promote kidney stone formation: http://www.medscape.com/viewarticle/539022  Kidney stones are supposed to be exquisitely painful, something I hope never to experience myself!

Some may think that one is vanity driven to be concerned about carb-face.  But carb-face may be a surface indication of more insidious, health-damaging processes occurring inside your body - arthritis & joint disfigurement and kidney stone formation.  It's not vanity to want to protect your mobility and renal function!  Check out the Lance Armstrong Foundation website for info on how to beat carb-face: http://www.livestrong.com/article/251123-how-to-burn-facial-fat/

Friday, November 4, 2011

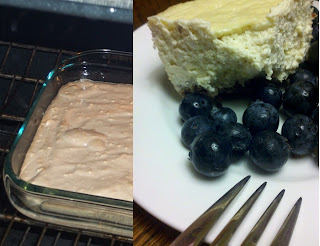
Recipe #10 - Cheesecake


Cheesecake - before & after
The holidays are upon us, so this is the perfect time to share a dessert recipe to get you through the minefield of sweets that will stretch through Valentine's Day!!!  This cheesecake is not just a nice dessert/ teatime snack; I often have a slice for breakfast when I'm too rushed to whip up eggs.  I eat it plain or with some fresh berries or with a dollop of sugar-free preserves.  It's a fairly simple recipe aside from the laborious mixing & the long baking time.  I've included a variation for CHOCOLATE flavor, too!

Ingredients:

Crust:
·         1 ½ cups almond meal
·         1 heaping Tablespoon wheat bran
·         1 heaping Tablespoon ground flaxseed
·         3 Tablespoons butter
·         2 Tablespoons Splenda
Filling:
·         3 packages (1 ½ lbs) full fat cream cheese (room temperature)
·         4 eggs (room temperature)
·         2 Tablespoons vanilla
·         1 teaspoon almond extract
·         1 ½ teaspoons ( ½ Tablespoon) lemon juice
·         1 1/3 cups Splenda (or 3/4 cup Splenda + 7 packets stevia)
·         1/4 cup full fat sour cream

Preheat the oven to 400F.  Melt the butter in a 8"x8" baking dish.  Add the remaining crust ingredients & mix to evenly disperse the melted butter.  Then smooth out the crumbly mixture over the bottom & lower sides of the dish to form the crust.  Bake for ~7 minutes, until the crust is golden NOT brown.
While the crust is baking, mix all the ingredients for the filling, save for the cream cheese, in a large mixing bowl until well-combined.  I use a whisk for a little biceps workout!  But you wimps (lucky dogs!!!) with stand mixers can use those instead.  ;-)  Next, whip in the cream cheese, one packet at a time, so that the final cheesecake will be airy & smooth rather than dense & lumpy.  ROOM TEMPERATURE cream cheese & eggs are key here!  Top the baked crust with the filling mixture then return to the oven.  Immediately lower the oven temperature to 250F.  Then bake for 1 hour or more until a toothpick inserted in the middle comes out clean.  My cheesecake always cracks, which I hear is a no-no.  But I don't mind - it doesn't affect the flavor.  Chill then enjoy!
For chocolate cheesecake:
Crust: Use ground hazelnuts instead of almond flour + 2 Tablespoons cocoa
Filling: use 1 Tablespoon cocoa + almond extract + vanilla – lemon juice

Thursday, October 13, 2011

Recipe #9 - Moussaka


Moussaka - before & after
 Moussaka is a labor of love.  It is a solid two hours+ of cooking.  I kid you not.  This is not a recipe for a quick dinner.  If you've never had it, moussaka is a yummy heartiness that you will CRAVE after you taste it for the first time.  When I make this, my husband tells me not to invite anyone over for lunch so that there will be more left over for him at dinnertime! 

I've adjusted a traditional recipe according to my cupboard: tarragon replaces herbes fines; tomato basil pasta sauce subs in for plain tomato sauce; long Japanese eggplants replace regular eggplants which tend to have large, hard seeds; and the egg is left out of the meat layer (one less step which seemed superfluous anyway).

Moussaka has a bechamel sauce on the top layer.  Bechamel starts with a roux, which is butter-fried FLOUR!  Not low carb by a long shot.  So my version uses soy flour and my sauce secret weapon - cornstarch.  Corn can be a friend; a tiny amount of cornstarch can thicken sauces like a pile of flour, and baby corn is a high-fiber yet tender veggie which is not yet loaded with carbs like the mature corn on the cob.

Ingredients:
  • 4 large, long Japanese eggplants, cut lengthwise into 1/2 inch thick slices
  • salt
  • canola oil for frying
  •  
  • 1 tablespoon butter
  • 1 pound lean ground beef
  • salt to taste
  • ground black pepper to taste
  • 2 onions, chopped
  • 1 clove garlic, minced
  • 1 teaspoon ground cinnamon
  • 1/2 teaspoon ground nutmeg
  • 1 teaspoon tarragon
  • 2 tablespoons dried parsley
  • 1/2 (25 ounce) jar tomato basil pasta sauce
  • 1/2 cup red cooking wine (or whatever red you have available)
  •  
  • 4 cups Mootopia (hi protein reduced carb) milk
  • 1 stick (1/2 cup) salted butter
  • 6 tbsp soy flour
  • 1 heaping tsp cornstarch dissolved in a splash of cold milk
  • 1 cup grated Parmigiano-Reggiano/Pecorino Romano cheese divided into 1/3 cup portions
  • 1/4 teaspoon ground nutmeg
  • ground white pepper, to taste
Directions:

1.     Lay the slices of eggplant on paper towels; sprinkle lightly with salt then set aside to draw out excess water while preparing the meat layer.
2.     In a large skillet over medium heat, melt the butter.  Then add the ground beef, salt and pepper to taste, onions, and garlic. After the beef is browned, add the cinnamon, nutmeg, tarragon, parsley, pasta sauce, and wine.  Mix well. Simmer for a few minutes to evaporate the alcohol from the wine. Remove from heat.  (I don't salt my beef because the cheese, butter, cooking wine, & eggplant already have plenty of salt)
3.    In another skillet, heat the canola oil on medium. Fry the eggplant until browned & softened. Set aside on paper towels to drain. When adding more oil to the pan, pour oil in on the side of the pan closest to you, then tip the pan away from you to spread the oil throughout the pan.  This avoids splatters in your face!!!
4.     To make the bechamel sauce, begin by warming the milk in the microwave (use your Pyrex measuring cup to save washing up too many vessels). Melt the stick of butter in the eggplant skillet over medium heat (bits of caramelized eggplant flavor will enhance the béchamel). Whisk in soy flour until smooth. Lower heat; gradually pour in the warm milk, the dissolved cornstarch, & 1/3 cup of grated cheese.  Whisk constantly until it thickens.  Season with white pepper. 
5.     Preheat oven to 350F.  Meanwhile, arrange a layer of eggplant in a buttered 9x13 inch baking dish. Cover eggplant with all of the meat sauce.  Sprinkle 1/3 cup of cheese over the meat. Cover with remaining eggplant, and sprinkle another 1/3 cup of cheese on top. Pour the bechamel sauce over the top, and sprinkle with the nutmeg.
6.    Bake for 45 minutes - 1 hour at 350F.

Original recipe: http://allrecipes.com/Recipe/moussaka/detail.aspx

Recipe #8 - Chicken Curry in a Hurry

Chicken Curry in a Hurry - before & after
I love to start my recipes with a 'before & after' photo.  Just as it can be inspiring to see personal transformations, cooking transformations may inspire you to try something new!

I don't like to cook very spicy so that the kids can also partake.  If you want some fire though, add 1 tsp red chili powder when you add the ginger or 1 whole fresh jalapeno when you add the tomato or spice it up to your own taste.

One technique that I mentioned previously (see Recipe #7 - Indonesian-Inspired Chicken with Snow Peas & Baby Corn) is marinating the protein with cornstarch.  This is an oriental technique that you don't find in authentic South Asian cooking.  But it lends itself to a speedy preparation.  Real Indian curry is simmered for-EVER to produce that awesome flavor.  You know when your curry is done because the oil separates from the sauce (a trick I learned from my in-laws).  To speed things up, I use the cornstarch to tenderize the meat and thicken the sauce.

Indian curry is usually served with rice or flat bread - a refined carb of some kind.  Serve yours with a cucumber & tomato salad or in a lettuce cup for a reduced carb, refreshing taste that won't bulk you up.  Or scoop it up with a reduced carb tortilla.  Cucumber salad is super easy to make: slice up your cukes & tomatoes however you like; then splash with lemon/lime juice & sprinkle on some salt to your taste plus a dollop of Greek yogurt too to cool off the palate.  Done!

Ingredients:
2 tbsp coconut oil
½  white onion, finely minced
2 tsp garlic, minced
2 tbsp ginger, minced
1 cup tomato, diced (I prefer grape tomatoes)
1 ½ lbs boneless, skinless chicken thighs, cut into 1 inch pieces
2 tbsp (yellow) curry powder

½ tbsp. corn starch
Drizzle of canola oil (~1 tsp)
1 ½ tsp sea salt (or to taste)
1 tsp Splenda
1 cup unsweetened coconut milk
2 tbsp fresh cilantro, chopped


Marinate chicken with corn starch, curry powder, & canola oil.  Preheat a skillet over medium high heat.  Add the coconut oil and sauté the onion until translucent; add garlic, salt, & ginger and continue to cook until caramelized (slightly brown).  Add the chicken and cook until the chicken is browned on all sides.  Add the tomato, salt, Splenda, and coconut milk.  Reduce heat to medium low and simmer until the chicken is cooked through & sauce thickens.  Remove from heat and stir in the cilantro. 

Original recipe: http://www.eclecticcook.com/quick-chicken-curry/

Thursday, September 29, 2011

Recipe #7 - Indonesian-Inspired Chicken With Snow Peas & Baby Corn

Indonesian-Inspired Chicken - before & after
My background is Asian, so stir-fry is a very comfortable way for me to cook.  In addition, stir-fry dishes can be made to include both your protein & non-starchy veg in a very time efficient preparation.  The majority of your time will be spent in chopping everything up.  If you don't mind the added expense, buy your meat already skinned, deboned, & chopped to save even more time.  I serve this to my kids with steamed brown rice; for the grown-ups, with a side of another non-starchy veg or salad.  One note on Asian cooking sauces: they frequently contain sugar in various forms, so use with a bit of caution!

Ingredients:
2 1/2 lbs chicken breast & thighs, chopped into bite sized pieces
2 cloves garlic, minced
2 tbsp ginger, cut into chunks which can be removed easily or grated for a spicier taste
1 stalk lemongrass, finely chopped
1 tbsp ketjap manis
1/2 tsp sambal terasi
1 tbsp soy sauce
2 tsp sesame oil
1 tsp corn starch
1 cup snow peas, de-stringed & chopped on the bias
2 cans of baby corn, drained & rinsed, chopped if desired
olive or canola oil for frying
1 tsp oyster sauce + 1 tsp ketjap manis for each batch*

Combine all the ingredients up to & including corn starch (the corn starch acts as a meat tenderizer & will thicken the final sauce).  I usually do this before I prep the veggies so that the meat has some time to marinate.  Heat the wok on high heat.  Add oil enough for frying (~1.5 tbsp) then half of the marinated chicken & snow peas.  Stir constantly until chicken is cooked through.  When the chicken is half done, add the tsp oyster sauce & tsp ketjap manis and 1 can of baby corn.  Rinse & repeat!  ;-)

*after marinating the meat, it will be cooked in two batches for an average sized wok; if you've got a giant wok & a stove with a massive burner to keep the wok hot a la Panda Express - one of my family's fave restaurants, go for the one big batch!

Tuesday, September 27, 2011

Recipe #6 - Slow Cooker Saag Kabob Loaf

Meatloaf - before & after
Two of my favorite Indian foods are saag paneer (creamed spinach with homemade cheese) and beef kabob.  Both are fabulous low carb meal items.  And both take quite a bit of effort & time in the kitchen to prepare.  You could order take-out, but good Indian food tends to be expensive.  This became my inspiration for a low prep-time, self-tending entree with great flavor.  Serve it with diced cucumbers, tomatoes, & red or white onions marinated for a few minutes with lemon juice & a sprinkle of salt.  Or roasted veg (see Recipe #5)!  Dee-lish!

Saag Kabob Loaf
1 lb ground beef
1-10 oz package of frozen chopped spinach, thawed & drained in a colander then pressed in paper towels to remove all excess water
1 egg, beaten
Splash of cream
2 tsp onion powder
1 tbsp garam masala
½ tsp sea salt or to taste
¼ cup reduced sugar tomato ketchup + more to top loaf
1 small onion cut into thin rings

Layer onion rings on the bottom of a slow cooker pot.  Mix well all other ingredients in a bowl then form into a loaf.  Place loaf on top of the onion rings.  Then top loaf with a layer of ketchup, as much or as little as you like.  Cook in slow cooker on the ‘high’ setting until meatloaf interior temperature is 160+F (~ 2 ½ hrs).

Blood Lipids

After my father died, I felt a driving need to get a hold of my health.  Since both my parents were hypertensive and diabetic and had cancer, I sensed an impending doom being overweight.  So I embarked on the quest to lean down.  I don't say 'lose weight' because it is possible to be normal or even under-weight but still have a high percentage of body fat.  In the weight-lifting world, this is known as 'skinny fat'.  In the medical world, this is known as 'normal weight obesity'.  See this link for more information on the condition: http://advanced-fitness-concepts.com/articles/1010TM.pdf  Skinny fat people as well as conventionally obese and overweight people may experience insulin resistance or prediabetes.  BMI-wise, I was technically 'overweight' on the cusp of 'obese'.  Not a healthy place to live. 


Enter the low carb lifestyle change, which truly worked to lose bodyfat (check out previous posts).  But enter criticism & concern from others who hold on to the 'eating fat makes you fat & unhealthy' dogma.  There was a sincere concern from family members about cholesterol and heart health since low carb eating is also high fat.  To allay concerns, I got a physical done complete with bloodwork.  I had results from my last physical in 2007 with which to compare.  Keep in mind that four years ago I ate a typical "healthy" diet: whole grains many times daily (oatmeal or whole grain cereal at breakfast, whole wheat bread for sandwiches at lunch, brown rice with dinner); low fat or fat free snacks (baked, low-fat crackers/chips, raisins, fruit); fat-free/ reduced fat dairy (skim milk in coffee & cereal, reduced fat cheeses, heart healthy spread instead of butter).


Note on VLDL & LDL levels: VLDL & LDL are not directly measured but rather calculated based on your triglyceride level.  See the following link for an explanation: http://www.livestrong.com/article/30831-calculate-ldl-cholesterol/  Step 3 in the link is your VLDL number, although it does not state that on the webpage (VLDL = triglyceride/5).


<><><><>
2007
2011
healthy range
total cholesterol
175
195
100-199 mg/dL
triglycerides
94
42
0-149 mg/dL
HDL cholesterol
53
87
>39 mg/dL
VLDL cholesterol (calculated)
19
8
5-40 mg/dL
LDL cholesterol (calculated)
103
100
0-99 mg/dL


As you can see, on the low carbohydrate high fat diet, my triglycerides dropped more than 50% to less than 1/3 of the maximum healthy range.  Keep in mind that triglycerides and good cholesterol (HDL) are greater predictors of future coronary events (ie heart attacks) than are total cholesterol.  You want triglycerides low & HDL high.  In my case total cholesterol increased because my HDL increased to a level more than double the recommended minimum value, which again is what you want.  VLDL & LDL (aka bad cholesterol) both dropped for me in response to the low carbohydrate high fat diet change.  Here is a useful link for understanding blood lipids: http://www.everydayhealth.com/heart-health/high-triglycerides-versus-bad-cholesterol.aspx  But to really get the science & politics of blood lipids, I recommend reading Gary Taubes' Good Calories, Bad Calories.


Here's something 'fun' that could also be very enlightening.  It's a heart attack risk calculator from the American Heart Association:  https://www.heart.org/gglRisk/locale/en_US/index.html?gtype=health

So to sum up:  we have been lead to believe that eating fat turns into 'bad fat' (triglycerides, LDL, & VLDL) in the blood which then clogs arteries.  Contrary to that, most recent science shows that eating carbohydrates increases triglycerides ('bad fat') and eating smaller amounts of carbohydrate along with increased percentage of calories from fats boosts your good cholesterol (HDL) while lowering your 'bad fat'.

At this point, being the wife of an attorney, I feel compelled to say that I DO NOT work as a medical professional, and my writing should NOT be construed as medical advice.  Consult your regular health care provider before making any changes to your diet, exercise regime, or medication regime. !!!

Monday, September 26, 2011

Recipe #5 - Roasted Haricots Verts

Beans - before & after

Haricots verts - that's green beans, y'all!  This is the easiest side dish recipe you will ever make.  I promise.  You can actually roast any kind of non-starchy veg with fantastic results - artichoke hearts, asparagus, zucchini, summer squash, turnips, etc.  Just watch your veg & adjust the time to make sure that it doesn't burn.  Fresh veg roasts faster; frozen veg takes longer.   Turnips are actually an AWESOME substitute for potatoes (yes, I'm that old that I learned to spell it T-O-E-S).  This preparation is SOOOO good with cauliflower; it becomes a close facsimile of deep fried Mediterranean/Middle Eastern cauliflower which is so addictive and with a lot less effort/mess.  Not so great with broccoli, though.  Don't know why.  It just seems to burn up rather than caramelize.

Ingredients:
  • non-starchy veg, frozen or fresh
  • olive oil
  • sea salt

1)  preheat oven to 400F
2)  fill 8"x13" baking dish with frozen haricots verts to the rim (young green beans, which are more tender - tenderer??? - than the grown-up version, but they'll do, too)
3)  drizzle olive oil & spinkle with sea salt to your taste
4)  toss the beans to distribute oil & salt (I use my hands)
5)  bake in the oven until beans are soft & toasted on some edges, tossing once after ~15 minutes, i.e. half way cooked (this time use tongs, please)

Thursday, September 8, 2011

Recipe #4 - Pimento Cheese Spread

Pimento Cheese Spread - A Thing of Beauty

I've just about gone broke buying Whole Foods pimento cheese spread.  It's so good!  Hence the necessity to make it myself.  Enter Paula Deen's recipe, which I tweaked to replicate that WF flavor.  I enjoy it piled half an inch thick on a slice of Wasa Crisp'n Light 7 Grain Crackerbread (3.7 net carbs per cracker).  It sort of scratches that Cheetos itch...sort of.  J   Why do I have a Cheetos itch if I'm eating low carb, do you ask?  My husband says that I cheat too much because cravings go away after 'induction'.  I say it's a woman thing - don't go there!  Purists could easily enjoy it on celery or slices of cucumber.

Ingredients
  • 1 - 3 oz package cream cheese, room temperature
  • 2 cups grated sharp cheddar
  • 1 ½  cups grated Monterrey Jack or other white cheese (white cheddar, mozzarella, pepper jack, etc)
  • ¼  cup mayonnaise
  • sour cream to taste/ desired smoothness
  • ½  teaspoon garlic powder
  • ¼ tsp salt or to taste
  • 1 tsp dried dill
  • 2/3 – 4 oz jar of diced pimentos including juice
  • ¼ - ½  finely minced white or red onion
  • Black pepper to taste
Directions
Combine cream cheese, ¼ cup mayo, onions, pimentos, & spices in a large bowl until smooth.   Add grated cheeses plus sour cream to your taste or until you get your desired smoothness for the spread.  I end up using about ¼ cup sour cream total.  Chill at least one hour to allow the flavors to marry, if you can wait that long!